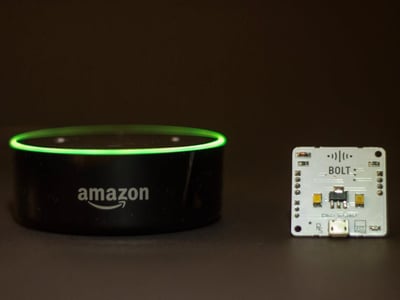
We connected the Amazon Echo with the light in the room to build a voice-controlled light. Just say, Alexa! Turn on the light, and the lights come on.
The best part, this project is super easy to build and take about 5 mins to get ready. Ok! Maybe a bit more than 5 mins but can undoubtedly be completed in an hour even if you are starting from scratch and have no previous experience.
In this project, I have assumed that you have already linked your Bolt WiFi module with your Bolt cloud account. If you have not yet done so, please download the Bolt IoT app for iOS and Android and follow the steps in the App.
Here is how the information flows:
Words from your mouth -> Amazon Echo -> IFTTT -> Bolt Cloud via APIs -> Bolt WIFi Module -> LED
Here is a video of the project in action:
Things used in this project
Hardware components
You can get most of these components with the  . The kit is included as part of the Bolt IoT and ML hands-on video training.
Software apps and online services
Hardware Setup
Step 1: Plug the longer (+ve) end of the LED in the Pin 0 of Bolt WiFi module shorter (-ve) end to the ground pin (GND) as shown in the image below.

Photo of the circuit connection
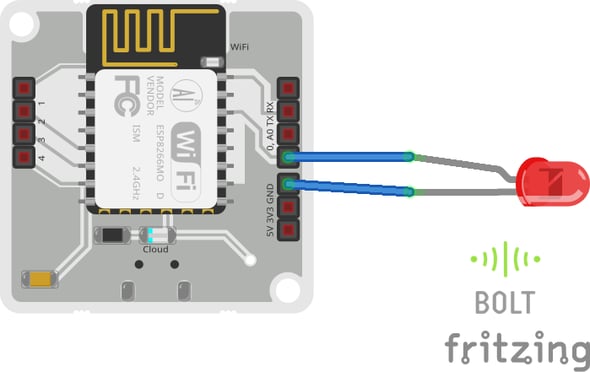 Circuit digram
Step 2: Power on the Amazon Echo and Bolt WiFi Module.
Software Programming
Step 1: Getting the Bolt API Key and Device ID
Login to cloud.boltiot.com and note the ID of your Bolt WiFi Module.
Now click on the API tab and under the section for Generate Key, click on Enable.
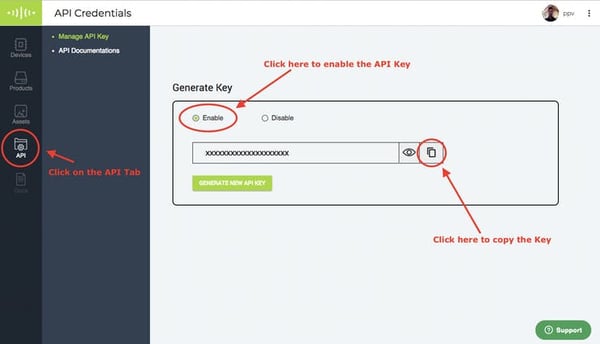
Next click on the copy button to copy your API key. Your API key will may look something like this: f1f918e9-d9c2-4e5b-aed0-b7cb743f74cf
Step 2: Writing the GPIO Control Command
Since LED is a digital output device, we will need to get a Digital Write command that can be sent to Bolt over the Internet to switch on the LED.
In Bolt Cloud go to Docs Tab -> API Documentation -> GPIO Commands API -> Write Digital Output
The command to write digital output is:
https://cloud.boltiot.com/remote/f1f918e9-d9c2-4e5b-aed0-b7cb743f74cf/digitalWrite?pin=0&state=LOW&deviceName=BOLT13819450Make sure that you change the API Key to your own API Key and device ID which you got in the previous step.
If you have connected the LED to any other pin other than Pin 0 then make a suitable change in the pin no in your code.
Step 3: IFTTT integration via Alexa and Webhooks
Go to IFTTT to create a new applet by clicking here https://ifttt.com/create
Click on +This
Choose Amazon Alexa -> Say Specific Phrase
Type the phrase you want to trigger the action. I used 'lights on' and click on 'Create Trigger'.
Click on +That
Select Webhooks and then Make a web request
Enter the API URL you got in the previous Step. Make sure that you change the API Key and device name.
Method will be GET
Content type will be Application/json
Here is how your screen will look like
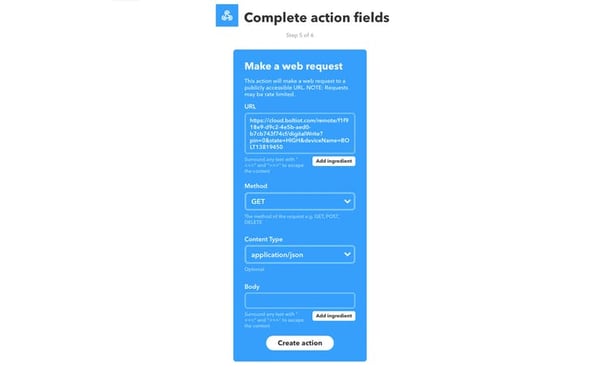
Click on 'Create Action' and then click on 'Finish.'
Now do the same process for a command to switch off the LED. Here you will change the state to LOW, i.e. state=LOW in your code. Here is a sample of the code. Also, add a suitable phrase to switch off the LED.
https://cloud.boltiot.com/remote/f1f918e9-d9c2-4e5b-aed0-b7cb743f74cf/digitalWrite?pin=0&state=LOW&deviceName=BOLT13819450 That's it. The project is ready.
Now switch on your Alexa, Bolt WiFi Module and say the words to see the magic happen.
Want to build more such IoT and ML projects? Want to learn IoT and ML from basics?
Check out the Bolt IoT and ML training. This online video training is excellent for those who want to start with IoT and ML because it teaches you to build projects from the basics. Click on the button below to know more about the training.


