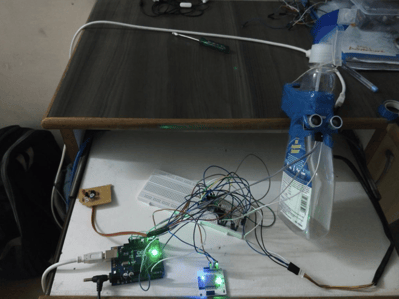
This project was made by Shubham Jain as a part of the "Fight COVID-19 using IoT and ML" Challenge. Here is a video made by Shubham Jain showing how the project works. You can build the project yourself by going through the rest of the blog.
Respiratory viruses like coronavirus disease (COVID-19) spread when mucus or droplets containing the virus get into your body through your eyes, nose or throat. Most often, this happens through your hands. Hands are also one of the most common ways that the virus spreads from one person to the next.
You can avoid the spread of the virus, by frequently washing your hands or by washing your hands or by using hand sanitizer. Shubham Jain has gone one step forward by setting up a contact free hand sanitizer dispenser along with a reminder and alert system, which reminds people passing by to sanitize themselves. Lets have a quick look at how to make such a system.
In this project he has used an 2 sensor to count each person 2 times. Once to check if a person has passed by, and the other to check if the person has used the sanitizer. If the count does not match, the system starts a buzzer and sends an alert to the owner of the system telling them that a person who passed by did not use the sanitizer.
Things used in this project
Hardware components

- Arduino Uno
- HC-SR04 ultrasonic sensor.
- IR Sensor
- Buzzer
- Jumper Wires
- Breadboard
- L293d motor driver ic
- Stepper motor (Bipolar stepper motor)
- 12v DC supply.
Software, Apps and online services
Hardware setup
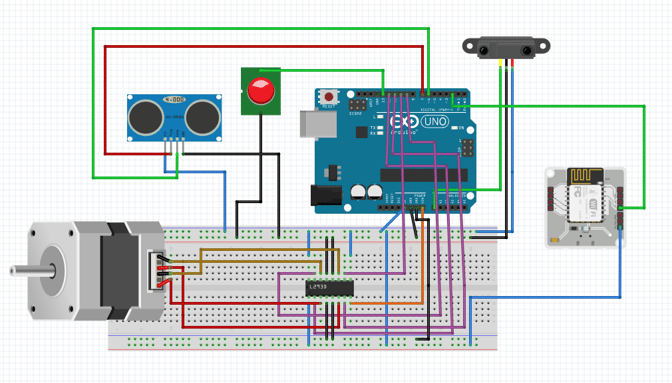
Step 1] Make the circuit connection as per the fritzing diagram shown below.
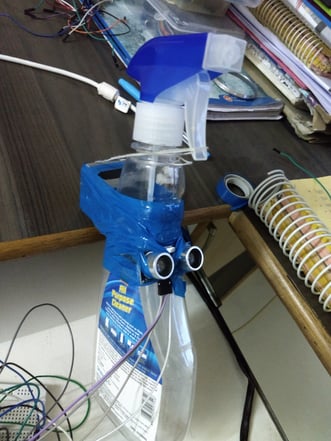
Step 2] Mount the Stepper motor and the Ultrasonic sensor on the hand sanitizer dispenser using tape, as shown in the images below.
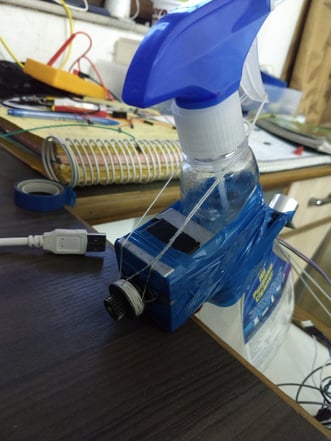 .
. 
Step 3] Place the IR sensor in such a manner that it can detect people passing near it.
Step 4] Power up the system by connecting the 12v DC supply to the Arduino.
Step 5] If you have not already done so, click here to see a video which will you how to configure the Bolt WiFi module to connect to the internet.
Software Programming
Step 1] Open the Arduino IDE, and write the following code into the IDE.
#define trig 7 //trigger pin of ultrasonic sensor
#define echo 6 //Echo pin of ultrasonic sensor
#define ir A0 // Output pin of IR sensor
#define buz 13 // For Buzzer
#define bolt 2 // Pin to Bolt Wifi module PIN 0
#include <Stepper.h>

int in1Pin = 12;
int in2Pin = 11; // for stepper motor
int in3Pin = 10;
int in4Pin = 9;

// change this to the number of steps on your motor
#define STEPS 512

Stepper motor(STEPS, in1Pin, in2Pin, in3Pin, in4Pin);
int count1 =0; // counting number of persons by ultrasonic sensor
int count2=0; // counting number of persons by IR sensor sensor
void setup()
{
    Serial.begin(9600);
    pinMode(trig,OUTPUT);
    pinMode(echo,INPUT);
    digitalWrite(trig,LOW);
    delayMicroseconds(2);
    pinMode(in1Pin, OUTPUT);
    pinMode(in2Pin, OUTPUT);
    pinMode(in3Pin, OUTPUT);
    pinMode(in4Pin, OUTPUT);
    pinMode(buz,OUTPUT);
    pinMode(ir,INPUT);
    pinMode(bolt,OUTPUT);
    while (!Serial);
    digitalWrite(bolt,HIGH);
    Serial.begin(9600);
    motor.setSpeed(50);
}

void loop()
{

    digitalWrite(trig,HIGH);
    delayMicroseconds(10);
    digitalWrite(trig,LOW);

    int t = pulseIn(echo,HIGH);

    int d = (0.000001)*(34300*t)/2; // d is the distance calculated by ultrasonic sensor
    delay(500);

    if(d<=10)
    {
        motor.step(-100);
        count1 = count1 +1;
        motor.step(100);
    }
    Serial.println("US");
    Serial.println(count1);
    if(digitalRead(ir) == LOW)
    {
        count2=count2+1;
    }
    Serial.println("IR");
    Serial.println(count2);
    if(count2 > count1)
    {

        digitalWrite(buz,HIGH);
        digitalWrite(bolt,LOW);

    }
}
Step 2] Use a USB cable to connect the Arduino UNO to the computer and upload the code from the Arduino IDE.
Step 3] Go to repl.it and click on the blue "<>Start coding" button.
Step 4] Select the language as python, and click on the green "Create repl" button.
Step 5] Setup up twillio and mailgun, and copy the authentication strings from the two systems to be used later.
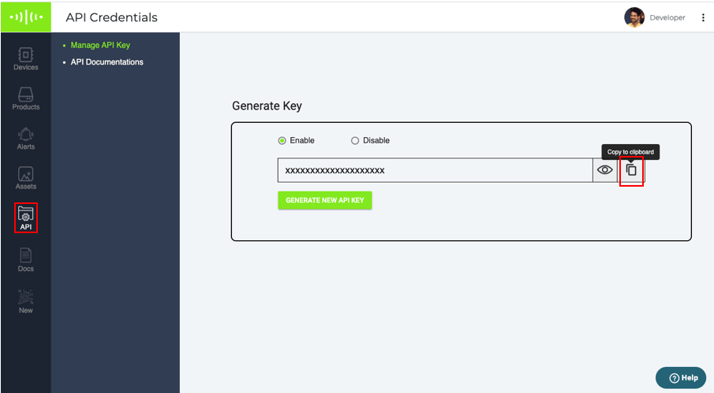
Step 6] Copy the API key for your Bolt Cloud account by going to API tab.
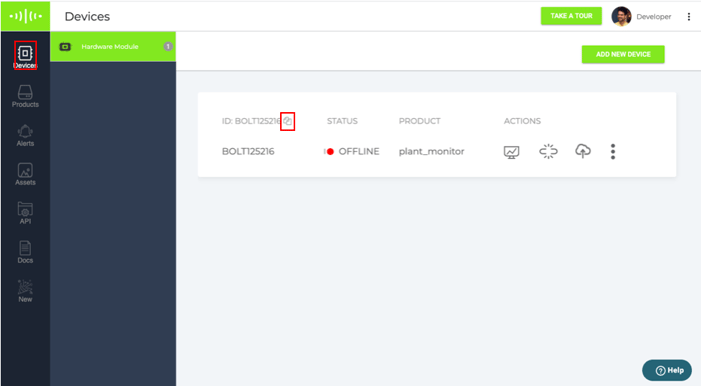
Step 7] Copy the id of your device from the devices tab in the Bolt Cloud dashboard.
Step 8] Create a new file named conf.py and add the following code into the file. Ensure that you replace all the authentication strings that you copied over in step 5, 6 and 7.
SID = "xxxxx"
AUTH_TOKEN = "xxxxxx"
FROM_NUMBER = "xxxxxxxx"
TO_NUMBER = "+91xxxxxxxx"
MAILGUN_API_KEY = xxxxxxxxx'
SANDBOX_URL= 'sandboxxxxxxxxx.mailgun.org'
SENDER_EMAIL = 'test@xxxxxxx'
RECIPIENT_EMAIL = 'xxxxx
API_KEY = "xxxxxxxx"
DEVICE_ID = "BOLTxxxxxxx"
Step 9] In main.py copy over the following code.
import conf
from boltiot import Email, Sms, Bolt
import json, time


mybolt = Bolt(conf.API_KEY, conf.DEVICE_ID)
sms = Sms(conf.SID, conf.AUTH_TOKEN, conf.TO_NUMBER, conf.FROM_NUMBER)
mailer = Email(conf.MAILGUN_API_KEY, conf.SANDBOX_URL, conf.SENDER_EMAIL, conf.RECIPIENT_EMAIL)

while True:
    print ("Reading sensor value")
    response = mybolt.digitalRead('0')
    data = json.loads(response)
    print("Value getting from Arduino : " + str(data['value']))
    try:
        sensor_value = int(data['value'])
        if sensor_value == 0:
            print("Making request to Twilio to send a SMS")
            print("Making request to Mailgun to send an email")
            response = mailer.send_email("Alert", "Somebody would not use sanitizer")
            response_text = json.loads(response.text)
            print("Response received from Mailgun is: " + str(response_text['message']))
            response = sms.send_sms("Alert ! Somebody would not use sanitizer")
            print("Response received from Twilio is: " + str(response))
            print("Status of SMS at Twilio is :" + str(response.status))

    except Exception as e:
        print ("Error occured: Below are the details")
        print (e)
Step 10] Click on the run button, and your project is ready to go.
Conclusion
With this project, you can help the society fight COVID-19, by reminding them to clean their hands using hand sanitizer.
Want to build more such IoT and ML projects? Want to learn IoT and ML from basics?
Check out the Bolt IoT and ML training. This online video training is excellent for those who want to start with IoT and ML because it teaches you to build projects from the basics. Click on the button below to know more about the training.


